
Can I attach a truck toolbox without drilling holes? Yes, some toolboxes offer drill-free truck toolbox mounting options, but drilling is often the most secure method for permanent installation.
Putting a toolbox in your truck bed is smart. It keeps your tools safe and organized. But how do you attach it firmly? A loose toolbox is a big safety risk. This guide will walk you through the best way to install your truck toolbox. We focus on strong, lasting attachment methods. Getting the truck toolbox mounting right matters for safety and peace of mind.
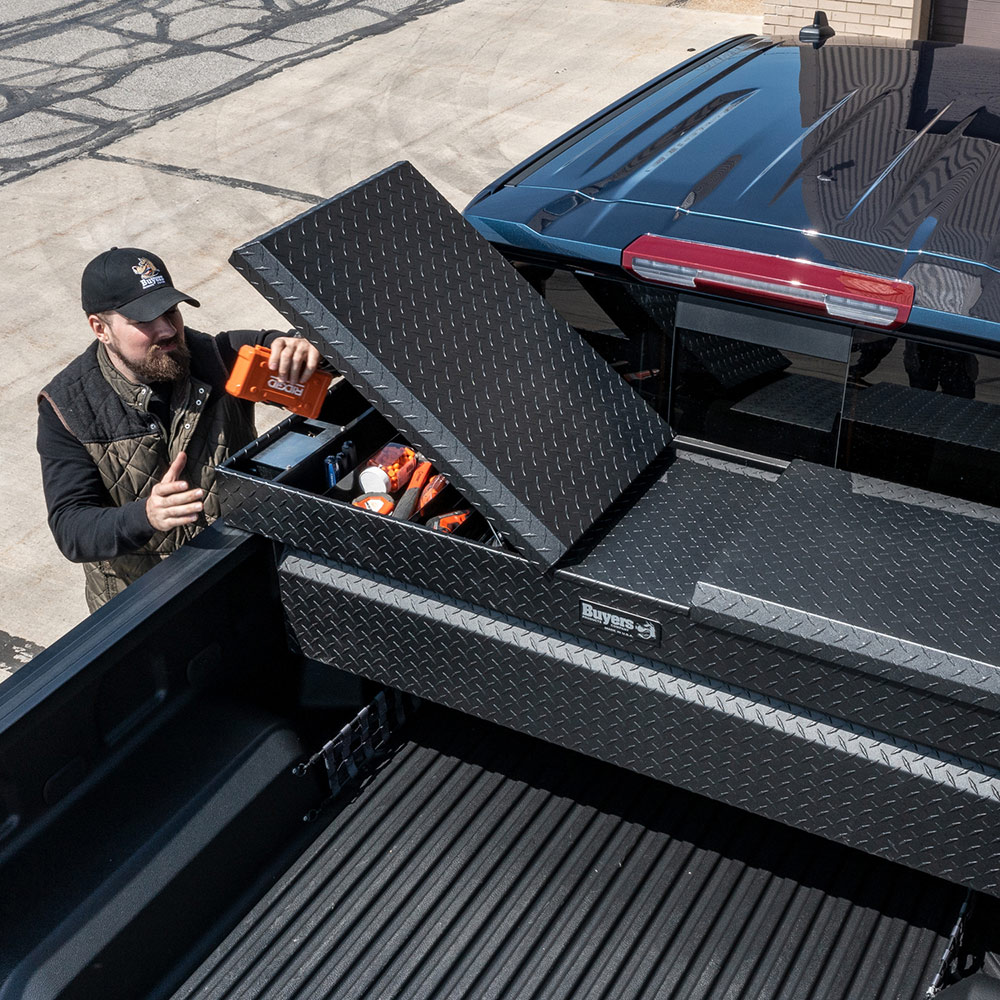
Image Source: contentgrid.homedepot-static.com
Why Secure Your Truck Toolbox?
A heavy toolbox can become a dangerous missile in a sudden stop or accident. Strong securing truck bed toolbox methods prevent movement. It also stops thieves. An unsecured box is easy to steal. A properly mounted box stays put, protecting your gear and other road users.
Choosing Your Toolbox Type
Toolboxes come in many shapes. The attachment method changes based on the type you have.
| Toolbox Type | Common Placement | Primary Mounting Consideration |
|---|---|---|
| Crossover/Crossbed Box | Sits across the width of the bed | Must handle weight across two sides |
| Side/Rail Box | Runs along the side rails of the bed | Needs strong anchor points on the bed rail |
| Underbody Box | Mounts underneath the truck bed | Requires specific frame attachment points |
This guide mainly covers the very common crossover or crossbed box attachment.
Step 1: Planning and Preparation
Before you grab a drill, good planning saves time and headaches. This is crucial for a successful truck toolbox installation guide.
Gathering Your Tools
You need the right gear before you start. Having everything ready makes the job fast.
- Safety Gear: Gloves and safety glasses are musts.
- Measuring Tools: Tape measure and a marker.
- Drilling Tools (If needed): Power drill, drill bits (metal-rated), and a center punch.
- Wrenches/Socket Set: To tighten bolts and nuts.
- The Toolbox Kit: Check if your box came with specific toolbox installation hardware.
- Optional: Anti-slip mat or weather stripping.
Inspecting Your Truck Bed
Look closely at your truck bed floor and rails.
- Clear the Area: Take everything out of the bed. Clean up dirt and debris.
- Check Bed Liner: If you have a plastic bed liner, you must drill through it. Some liners are thick. Decide if you need a longer bolt or if you must remove the liner section under the mounting points.
- Identify Mounting Points: Most trucks have pre-drilled holes or strong metal ridges near the front of the bed. These are ideal for installing crossbed truck box units. If no holes exist, you will need to drill.
Step 2: Choosing the Mounting Strategy
There are two main ways to attach your box: drilling/bolting or using clamps. The best way to install truck toolbox depends on your needs and truck style.
Option A: Drilling and Bolting (The Strongest Hold)
This method provides maximum security and is essential for heavy aluminum truck toolbox attachment.
Locating and Marking Holes
Precise marking prevents crooked installation.
- Position the Box: Place the toolbox exactly where you want it to sit. Make sure it doesn’t touch the cab if it is a crossover style. Leave a small gap for airflow or future repairs.
- Use the Brackets: Most toolboxes come with L-shaped or flat mounting brackets. Hold the bracket flush against the underside of the truck bed rail or floor where the bolt will go.
- Mark Centers: Use your marker to put a dot through the mounting hole on the bracket onto the truck bed surface.
Drilling Safely
Drilling into your truck requires care. You do not want to damage wires or brake lines running underneath.
- Center Punch: Use a center punch on your marks. This little divot stops the drill bit from wandering.
- Drill Pilot Holes: Start with a small drill bit. Drill slowly. Always check underneath the truck bed immediately after drilling a hole to ensure you missed anything important.
- Enlarge Holes: Increase the drill bit size gradually until the hole matches the diameter of your mounting bolt.
Tip for Rust Prevention: After drilling, clean the edges of the hole. Apply a thin layer of touch-up paint or clear coat over the exposed metal edge inside the hole. This stops rust from starting around the new mounting point.
Securing with Bolts
Use high-quality, corrosion-resistant hardware. Stainless steel or grade 8 zinc-plated bolts are best.
- Installation Order: Usually, you insert the bolt from underneath the bed, passing up through the drilled hole.
- Attach Bracket: Slide the mounting bracket over the bolt head on the underside. If the bracket is on top, place it over the hole.
- Secure from Above: Place a flat washer, then a lock washer, then the nut onto the bolt thread sticking up through the bed floor.
- Tightening: Hand-tighten everything first. Then, use your wrench to tighten firmly. Do not overtighten, especially if you have a thin metal bed, as this can bend the bed floor.
Option B: Clamp-Style Mounting (Drill-Free Truck Toolbox Mounting)
If you rent your truck or do not want to alter the bed permanently, clamps are a good solution. This falls under drill-free truck toolbox mounting.
How Clamps Work
These systems use heavy-duty hooks or C-clamps that grip the bottom edge of the truck bed rail. The hardware pushes up against the rail from below the bed, securing the box without penetrating the metal.
Pros: No holes, easy to remove.
Cons: Might not hold as securely as bolts for very heavy loads or off-roading.
Installation of Clamps
- Position Box: Place the box in its final spot.
- Install Clamps: Follow the manufacturer’s directions precisely for clamp placement. Usually, one clamp goes near each corner or mounting point provided on the box.
- Tighten: Use a wrench to tighten the clamp bolts. You are drawing the clamp up against the underside of the metal rail. You should feel strong resistance, but again, avoid bending the rail metal.
Step 3: Installing a Crossover (Crossbed) Box
Installing a crossover box requires balancing it securely across the bed sides.
Aligning for Fit
Crossover boxes are wide. They must clear the curves and ridges of the truck bed side rails.
- Check Rail Contact: Ensure the mounting feet of the box rest flatly on the truck bed rails. If they rock, you need to shim the rail contact points or adjust the box position.
- Center the Box: Use your tape measure to confirm the box is centered left-to-right in the truck bed opening.
Securing the Sides
This is where installing crossbed truck box methods become critical. You usually use four mounting points—two on the driver’s side rail and two on the passenger side rail.
- If using bolts (Option A), you will drill four sets of holes through the rails or the mounting flanges provided by the box manufacturer.
- If using clamps (Option B), you will attach the clamps securely to the inner lip of the truck bed rails at the designated points.
Always use the toolbox installation hardware supplied for your specific box model. Manufacturers design this hardware to match the structural strength of their product.
Step 4: Advanced Security and Safety Mounting
Once the box is physically attached to the truck, you must ensure it is safe for the long haul. This addresses truck toolbox safety mounting practices.
Utilizing Existing Anchor Points
Many modern trucks come with tie-down points in the bed. Can you use these?
For some smaller, lighter boxes, yes. However, most large, heavy toolboxes require dedicated mounting directly to the bed floor or rails. The weight distribution of a full toolbox exceeds the rating of standard tie-down points, which are often designed for loose cargo, not permanently fixed heavy equipment.
Reinforcing the Mount
If you are installing an aluminum truck toolbox attachment, you must be mindful of material difference. Aluminum is lighter but softer than steel.
- Use Fender Washers: Always place a wide fender washer between the nut and the truck bed material (or between the bracket and the toolbox itself, depending on design). This spreads the pressure over a larger surface area. This prevents the bolt head or nut from pulling through the metal under stress.
- Apply Threadlocker: For any bolted connection subjected to vibration (which is all truck mounts), use a medium-strength threadlocker (like blue Loctite). This prevents nuts from slowly vibrating loose over time.
Toolbox Tie-Down Methods for Extra Security
Even after mounting, some owners add extra protection. These are supplemental toolbox tie-down methods.
- Internal Straps: Some crossover boxes have pre-drilled holes inside the lid area. You can run heavy-duty ratchet straps from one side of the box, over the top of the contents, and anchor them to the opposite side rail, adding compression force.
- Cable Locks: Use thick braided steel security cables. Loop them around the frame or an unused secure anchor point on the truck and thread them through the designated handles or loops on the toolbox itself. This deters casual theft, even if the primary mounting is secure.
Step 5: Final Checks and Testing
Never skip the final inspection. A successful installation relies on thorough testing.
The Shake Test
After tightening every bolt and clamp:
- Get inside the truck bed (if safe and accessible).
- Grab the toolbox firmly.
- Shake it side to side, front to back, and up and down.
- Listen for any creaking or shifting. If you hear movement, get out and tighten the loose hardware immediately.
Load Testing
Once the box is empty, it should feel rock solid. Now, load it up with tools—as heavily as you plan to use it normally.
Perform a slow, careful test drive. Drive around the block, stopping gently. Listen again. After the first drive, check all the hardware one last time. Vibrations during the first few miles often cause slight settling. A final tightening ensures maximum grip.
Comprehending Maintenance
Regular checks keep your installation safe.
- Monthly Check: Visually inspect bolts and clamps.
- Quarterly Check: Use a wrench to confirm all nuts are still tight. Pay extra attention to the side where heavy tools are stored.
Comparing Mounting Techniques
Deciding between drilling and clamping is often the hardest part. Here is a quick comparison to help you decide.
| Feature | Drilling & Bolting | Clamp Mounting |
|---|---|---|
| Security Level | Highest (Permanent anchor) | Medium to High (Varies by clamp quality) |
| Truck Modification | Required (Creates holes) | None (Drill-free truck toolbox mounting) |
| Time to Install | Moderate (Requires drilling/measurement) | Quick |
| Rust Risk | Present, needs sealing | Very low |
| Best For | Heavy loads, long-term use, full customization | Renters, light to medium loads, quick setup |
FAQ Section on Truck Toolbox Attachment
How far from the cab should the toolbox sit?
Generally, leave at least 4 to 6 inches between the front face of a crossover toolbox and the rear window of the cab. This space allows for airflow, prevents the toolbox from interfering with cab access, and makes cleaning easier. Always check your specific truck model specifications, as some trucks have complex rear window curvature.
Can I use J-bolts instead of through-bolts for my truck toolbox mounting?
J-bolts (a type of hook bolt) can be used, especially if you are securing the box only to the top lip of the bed rails. They function similarly to clamps but use a bolt head tightened against the underside of the rail. They are a decent alternative for drill-free truck toolbox mounting, but ensure the J-bolt hooks tightly around a strong metal section of the rail, not just thin plastic trim.
What size drill bit should I use for mounting hardware?
This depends entirely on the diameter of the bolts provided in your toolbox installation hardware kit. If your bolts are 1/4 inch, you usually start with a 1/8 inch pilot bit, then step up to a 9/32 inch or 5/16 inch bit, depending on the exact fit needed. Always choose a bit that allows the bolt to pass through snugly without forcing it.
Is it safe to drill into the bed floor of a new truck?
Yes, it is common practice, especially when installing necessary equipment like a toolbox. The key is truck toolbox safety mounting. Ensure you are drilling into the main bed floor structure and not into areas where wiring harnesses or vital lines (like fuel or brake lines) run underneath the bed structure. A quick peek underneath before drilling is the best safety measure.
How tight should I make the nuts when installing an aluminum truck toolbox attachment?
When mounting aluminum boxes to steel beds, you must exercise caution. Use washers to distribute the load. Tighten the nuts until the washer is flat against the truck surface and the bracket is firmly seated, but stop before you see the metal bed start to deform, dimple, or buckle. Use a torque wrench if the manual specifies a torque setting; otherwise, aim for firm resistance, not maximum force.