
The standard hole saw diameter for deadbolt installation is 2 1/8 inches for the main cross-bore hole that goes through the door face. For the smaller hole for the bolt mechanism itself (the edge bore), you typically need a 1-inch hole saw, although some manufacturers might specify 7/8 inch.
Installing a new deadbolt is a common home improvement task. Getting the hole sizes right is crucial for a smooth fit. Using the wrong size can lead to a loose lock, a door that won’t close right, or even damaging your door. This guide will give you all the facts you need about the deadbolt hole saw size required for a perfect installation.
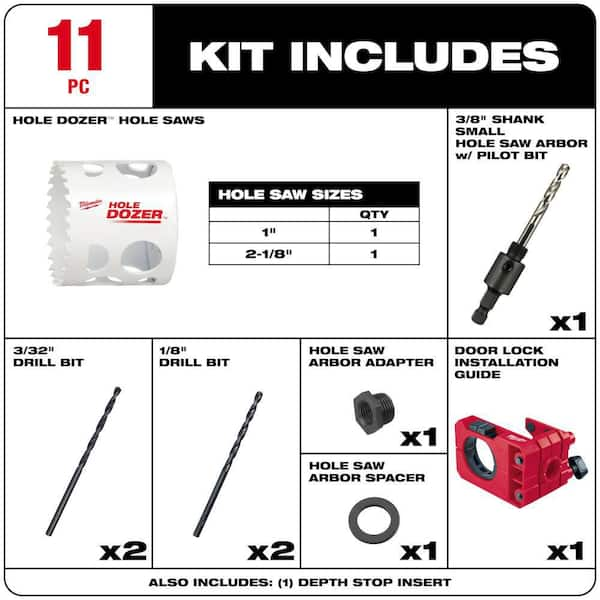
Image Source: images.thdstatic.com
Essential Measurements for Deadbolt Installation
When you buy a new deadbolt, it comes with instructions. These instructions list the exact sizes you need. However, knowing the standard sizes helps you prepare your tools beforehand. We look at two main holes you must drill for any standard deadbolt.
The Cross-Bore Hole Size
This is the biggest hole. It goes straight through the door from one side to the other. The keyhole and the main body of the lock cylinder go into this hole.
The industry standard for the standard deadbolt cutout size is 2 1/8 inches. This size fits almost all modern residential deadbolts made in North America. Always double-check your new lock’s packaging to confirm this measurement. If the hole is too small, the lock won’t fit. If it is too big, the lock assembly will wobble, offering poor security.
The Edge Bore Hole Size (Cylinder Bore)
This second hole is drilled into the thin edge of the door. This is where the actual bolt mechanism slides in and out.
For this hole, the most common hole saw diameter for deadbolt mechanisms is 1 inch. Some older or specialty locks might use a 7/8-inch hole saw. If you are replacing an old lock, measure the existing hole first. If you are drilling a new hole, use the 1-inch size unless your template says otherwise. This measurement directly relates to the size of the latch assembly itself.
Choosing the Best Tool for the Job
While you can use a spade bit or a regular drill bit for small pilot holes, a hole saw is the only tool that makes clean, circular cuts for the main body of the deadbolt.
Why Use a Hole Saw?
A hole saw is a cylindrical saw blade attached to a drill adapter. It cuts a clean circle, which is essential for the lock components to sit flush against the door surface.
Using a spade bit often tears the wood fibers, leaving a rough edge. This rough edge can interfere with the lock’s operation or make the lock look unprofessional. For clean work, the hole saw is key. This is why knowing the best hole saw for door lock installation is important.
Types of Hole Saws
Not all hole saws are the same. Doors are usually wood, but sometimes they are metal (like exterior security doors).
- Bi-Metal Hole Saws: These are the most common and versatile. They work well on wood, plastic, and thin metal. They are usually the best choice for standard wooden doors.
- Carbide-Tipped Hole Saws: These are tougher and designed for harder materials like masonry or thick metal. They might be overkill for a standard wooden door but will certainly cut through it.
When drilling wood, look for a hole saw with many teeth per inch (TPI) for a smoother cut.
The Importance of the Pilot Bit
Every good hole saw comes with a center drill bit, called the pilot bit. This bit is crucial. It keeps the hole saw steady while you start drilling. It ensures your large hole goes exactly where you intend it to go. Never start drilling the large hole without the pilot bit engaged first.
Step-by-Step Guide: Installing Deadbolt Hole Saw Guide
Proper technique prevents splintering and ensures accuracy. Follow these steps carefully when drilling for deadbolt lock installation.
Preparation and Marking
- Check Lock Specs: Always read the template provided with your new deadbolt. This is your final authority on sizes.
- Determine Height: The standard height for a deadbolt is usually 6 inches above the doorknob or handle. Mark this spot clearly on the side of the door where the lock cylinder goes through.
- Mark the Edge: Mark the center line on the edge of the door where the bolt will enter.
- Transfer Marks: Use a level or square to transfer the height mark accurately to both sides of the door face.
Drilling the Cross-Bore Hole (2 1/8 inch)
This is the hole for the main lock body.
- Attach the Hole Saw: Secure the 2 1/8-inch hole saw to the arbor (the part that connects to your drill). Ensure the pilot bit is centered.
- Drill from the Outside: Start drilling slowly from the outside of the door. Drill until the pilot bit just pokes through the inside face of the door. This breakthrough point is important.
- Switch Sides: Go to the inside of the door. Insert the pilot bit into the small hole you just created.
- Complete the Cut: Drill from the inside out. This technique, drilling from both sides, prevents the wood from blowing out or splintering when the large hole saw finally breaks through the other side. This is a core part of any good installing deadbolt hole saw guide.
Drilling the Edge Bore Hole (1 inch)
This is for the bolt mechanism itself.
- Select the Bit: Attach the 1-inch (or specified size) hole saw to the drill.
- Positioning: Align the center of this hole saw exactly with the center line you marked on the edge of the door, making sure it lines up perfectly with the center of the 2 1/8-inch hole you just drilled.
- Drill Carefully: Drill slowly into the edge of the door. You only need to drill deep enough for the bolt mechanism to sit flush. Usually, this means drilling about 1 1/2 inches deep, or until the hole meets the cross-bore hole.
Alternative Tool: Door Boring Tool for Deadbolt
If you plan on installing many locks or want the absolute easiest, most precise method, consider investing in a dedicated door boring tool for deadbolt. These tools, often called lock installation kits, use jigs and specialized bits to drill both the cross-bore and the edge bore perfectly aligned in one operation. They are highly recommended for professionals or serious DIYers.
Hole Size for the Latch and Strike Plates
Drilling the main holes is only half the battle. The lock won’t work right if the latch and strike plates aren’t fitted correctly.
Latch Plate Hole Size
The latch plate is the metal piece on the edge of the door where the bolt sticks out when locked or unlocked. This usually requires a rectangular cutout, not a circular one.
The size of this cutout depends on your specific lock. Most modern deadbolts use a standard latch plate hole size that is approximately 1 inch wide by 2 1/4 inches tall.
You typically do not use a hole saw for this. Instead, you mark the outline using the template and carefully chisel out the wood to fit the plate recess. The hole saw makes the cross-bore, and then you mark and chisel the mortise (recess) for the plate.
Hole Size for Strike Plate
The strike plate is the metal piece mounted on the door frame (jamb) where the deadbolt slides into when the door is locked.
Similar to the latch plate, this is a rectangular cutout. The hole that the bolt enters—the ‘keeper hole’—must align perfectly with the bolt. The hole saw size for strike plate installation is not applicable here, as the strike plate mounting holes are drilled separately. The opening itself needs to be large enough for the bolt to slide in without scraping the metal. Standard openings are usually about 1 inch wide and 1 1/2 inches high, matching the latch opening.
Deadbolt Installation Hole Size Chart Summary
To make things easy, here is a quick reference table covering the common dimensions. Remember, always check your lock manufacturer’s template first!
| Component | Typical Measurement | Tool Required | Notes |
|---|---|---|---|
| Cross-Bore (Main Body) | 2 1/8 inches | Hole Saw | Goes through the door face. |
| Edge Bore (Bolt Housing) | 1 inch (or 7/8 inch) | Hole Saw | Goes into the edge of the door. |
| Latch Plate Recess | Approx. 1″ x 2 1/4″ | Chisel | A rectangular cutout for the plate itself. |
| Strike Plate Hole (Keeper) | Approx. 1″ diameter opening | Chisel/Drill | Must align perfectly with the bolt. |
Fathoming Hole Saw Selection for Different Materials
While most guides focus on wood, you might be installing a deadbolt on a steel or fiberglass door. The selection of the right tool changes drastically in these scenarios.
Drilling Metal Doors
If you are installing a lock on a metal exterior door, a standard wood hole saw will quickly destroy its teeth.
- Material Consideration: Use a high-quality bi-metal hole saw designed for metal, or even a carbide-tipped saw.
- Lubrication: Use cutting oil generously. This keeps the teeth cool and helps the saw cut smoothly through the metal. Drill slowly.
- Pilot Hole: Start with a smaller drill bit to create a pilot hole before using the large hole saw. This prevents the large saw from “walking” across the slick metal surface.
Drilling Fiberglass or Composite Doors
Fiberglass doors are common, but they can be tricky. They are hard but can chip easily if drilled too fast.
- Technique: Use a sharp, clean hole saw (bi-metal is fine).
- Speed Control: Use a very slow drill speed. High speed generates heat, which can melt the fiberglass resin, creating a gummy mess that binds the saw.
- Back-Out Method: Drill slowly, and when you are close to breaking through, slow down even more, or consider drilling most of the way through from one side, then finishing from the back to minimize chipping on the visible side.
Precision Matters: Why Accuracy Is Everything
When dealing with lock hardware, precision is more than cosmetic; it’s about function and security. A poorly drilled hole compromises both.
Alignment Issues
If the 2 1/8-inch cross-bore and the 1-inch edge bore are not perfectly aligned, two problems occur:
- Binding: The bolt will bind against the side of the edge bore hole or the interior workings of the lock won’t seat correctly against the cross-bore wall. This leads to stiff operation or the bolt refusing to throw completely.
- Security Risk: A misaligned lock means the bolt may not enter the strike plate fully when closed. A partial engagement means the lock isn’t fully secured, making it easier to force open.
The Role of Templates and Jigs
This is why templates are non-negotiable. The template supplied by the manufacturer tells you the exact required measurements for that specific lock. If you are using a universal door boring tool for deadbolt, the jig ensures the two holes intersect correctly inside the door material.
Interpreting the Deadbolt Installation Hole Size Chart
While we provided a general chart, it is helpful to see how different brands might vary slightly, which is why the template is paramount.
| Deadbolt Style | Cross-Bore Diameter (Main Hole) | Edge Bore Diameter (Bolt Hole) | Typical Backset (Distance from Edge to Center) |
|---|---|---|---|
| Standard Residential (Grade 2/3) | 2 1/8 inches | 1 inch or 7/8 inch | 2 3/8 inches or 2 3/4 inches |
| Heavy Duty Commercial (Grade 1) | 2 1/8 inches | 1 inch | 2 3/8 inches or 2 3/4 inches |
| Some European Styles | Varies greatly | Varies greatly | Often smaller overall dimensions |
Note on Backset: While not directly related to the hole saw size, the backset (the distance from the edge of the door to the center of the cross-bore) is crucial. Standard backsets are 2 3/8 inches or 2 3/4 inches. Your pilot hole placement must account for this measurement.
Maintenance and Troubleshooting After Drilling
Even with the right hole saw size, issues can arise during the final assembly.
Troubleshooting Rough Holes
If your hole saw left a slightly ragged edge on the wood:
- Sand or File: Use sandpaper wrapped around a dowel or a small metal file to gently smooth the inside edge of the 2 1/8-inch hole.
- Test Fit: Gently insert the lock cylinder and bolt mechanism. They should slide in smoothly without catching. If they catch, locate the high spot causing the issue and file it down slightly.
Aligning the Strike Plate Perfectly
The alignment between the bolt (coming from the door) and the strike plate (on the frame) is the most common point of failure.
- Test Throw: With the door slightly ajar (not latched), throw the deadbolt all the way. See where the tip of the bolt lands on the door frame.
- Mark the Frame: Mark the center point on the frame where the bolt stops. This is where the center of your strike plate keeper hole must be.
- Chisel the Frame: Mark the outline of the strike plate on the frame. Chisel out the recess (mortise) so the plate sits flush. Then, drill the hole for the keeper, ensuring the hole saw size for strike plate alignment (or rather, the chisel depth) allows the bolt to enter smoothly.
Remember, installing a deadbolt successfully hinges on precise drilling. Using the correct deadbolt hole saw size (2 1/8″ for the face and 1″ for the edge) and applying proper drilling technique will save you time and ensure a secure, long-lasting installation.
Frequently Asked Questions (FAQ)
What size hole saw is needed for a standard deadbolt?
For a standard deadbolt, you need a 2 1/8 inch hole saw for the main cross-bore hole through the face of the door, and typically a 1 inch hole saw for the edge bore where the bolt mechanism sits.
Can I use a spade bit instead of a hole saw for the deadbolt?
While you can use a spade bit, it is strongly discouraged. Spade bits tear wood fibers and create rough holes that do not allow the lock components to sit flush, potentially compromising the lock’s function and security. A hole saw provides a much cleaner, professional cut.
What is the standard backset measurement for a deadbolt?
The two most common backsets for residential deadbolts are 2 3/8 inches or 2 3/4 inches. This is the distance measured from the edge of the door to the center of the large 2 1/8-inch hole. You must install the correct size for the mechanism you purchase.
How deep do I drill the edge hole for the deadbolt?
You drill the edge hole (the 1-inch hole) just deep enough for the bolt housing to sit flush with the door edge. This is usually about 1 1/2 inches deep, but you must ensure the hole meets the cross-bore hole drilled previously.
Do I need a special tool if I don’t have a hole saw?
If you don’t have a hole saw, the best alternative for precision is a dedicated door boring tool for deadbolt kit, which often includes specialized bits and jigs. If you must drill without one, you would typically use a combination of a spade bit (if desperate, carefully) or a series of progressively larger regular bits, followed by filing and chiseling, which is difficult to align perfectly. Purchasing the correct size hole saw is far easier and more reliable.