
Yes, you absolutely can install a lithium battery in your golf cart, and it is one of the best ways to improve its performance and lifespan. This golf cart battery replacement process is often simpler than people think, though it requires careful attention to safety and wiring specifics, especially when setting up a 48 volt lithium golf cart setup.
Lithium iron phosphate (LiFePO4) batteries are taking over the golf cart world. They offer lighter weight, much longer run times, and they last many more years than old lead-acid batteries. If you are serious about upgrading golf cart to lithium power, this guide will walk you through every essential step.
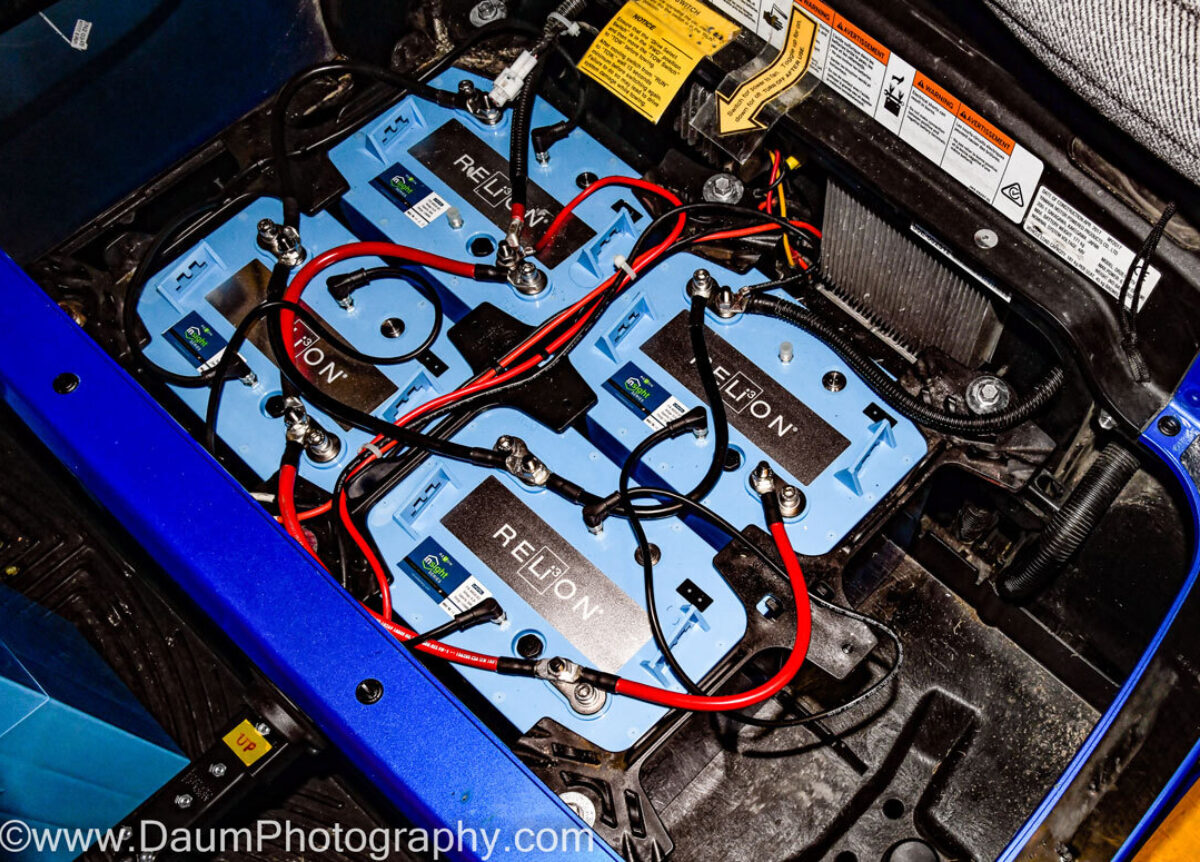
Image Source: ceb8596f236225acd007-8e95328c173a04ed694af83ee4e24c15.ssl.cf5.rackcdn.com
Why Choose Lithium Over Lead-Acid?
Before diving into the installation, it helps to know why so many people make this switch. Moving away from heavy, maintenance-heavy lead-acid batteries to deep cycle lithium for golf carts brings huge benefits.
| Feature | Lead-Acid Batteries | Lithium (LiFePO4) Batteries |
|---|---|---|
| Weight | Very Heavy (500+ lbs for a set) | Very Light (100-150 lbs total) |
| Lifespan | 3–5 Years | 10–15 Years |
| Maintenance | Daily water checks, cleaning | Virtually none |
| Runtime | Decreases as battery drains | Consistent power until fully drained |
| Charging Speed | Slow (8–12 hours) | Fast (2–4 hours) |
Best lithium batteries for golf carts generally cost more upfront. However, when you factor in the longer life and zero maintenance, the total cost of ownership is often lower.
Safety First: Preparation for Installation
Working with any high-power battery system demands respect and strict adherence to safety rules. Lithium batteries, while safer than older lithium types, still store significant energy.
Essential Safety Gear
Always wear protective gear before starting work. This prevents electrical shocks and acid burns (if you are removing old batteries).
- Safety glasses or goggles.
- Insulated gloves.
- Non-metal tools, if possible, or be extremely careful not to short anything.
Tools Needed for the Job
You will need a basic set of tools for this lithium golf cart installation guide:
- Socket wrench set (to remove battery trays and cables).
- Wire cutters and crimpers (if you need to make new terminal connections).
- Voltage meter or multimeter.
- Torque wrench (for tightening battery terminals correctly).
- Battery removal straps or a dolly.
Disconnecting the Old System
If you are replacing existing batteries, this step is crucial. Never mix battery types (lead-acid and lithium) in the same bank.
- Turn Off the Cart: Make sure the key switch is off. Put the forward/reverse selector in neutral.
- Disable Power: The safest method is to disconnect the main negative cable from the solenoid or controller first. This ensures no power flows through the system.
- Remove Cables: Use your wrench to carefully remove the cables connecting the batteries in series. Label them if you are confused, though this is less critical if you are removing the entire set.
- Remove Old Batteries: Lead-acid banks are very heavy. Use appropriate lifting tools or get help. Remove the hold-down clamps and slide the old batteries out. Dispose of them properly at a recycling center.
Step-by-Step: Installing New Golf Cart Lithium Battery Bank
This section details the core process of connecting golf cart lithium battery units, focusing on setting up a standard 48-volt system often found in modern carts.
Step 1: Preparing the Battery Tray
Lithium batteries are lighter and often smaller than their lead-acid counterparts.
- Cleaning: Thoroughly clean the battery tray. Remove any corrosion or debris left by old batteries.
- Securing: Lithium batteries must be held down firmly. Use the supplied hardware or brackets that came with your new batteries. They should not move when the cart is driven.
Step 2: Positioning the Batteries
Most 48 volt lithium golf cart setup requires four 12-volt batteries wired in series, or one large 48-volt battery pack.
- Single Pack: Place the large 48V pack securely in the main battery well.
- Multiple Packs: Position the 12V packs so that the terminals are easily accessible for wiring. Refer to your battery manufacturer’s instructions for optimal placement order.
Step 3: Reviewing the Golf Cart Battery Wiring Diagram
This is the most critical step for a successful installation. Incorrect wiring can damage the batteries, the charger, or the cart’s controller.
If you are replacing a standard 48V system (six 8V batteries or eight 6V batteries), you will usually replace them with four 12V lithium batteries.
Wiring in Series for Higher Voltage:
To go from 12V to 48V, you must connect the batteries in series.
- Connect the Positive (+) terminal of Battery 1 to the Negative (-) terminal of Battery 2.
- Connect the Positive (+) terminal of Battery 2 to the Negative (-) terminal of Battery 3.
- Connect the Positive (+) terminal of Battery 3 to the Negative (-) terminal of Battery 4.
This leaves one free Negative (-) terminal on Battery 1 and one free Positive (+) terminal on Battery 4. These two remaining terminals become the main output terminals for the entire cart system.
| Connection Point | Connects To | Purpose |
|---|---|---|
| Battery 1 (-) | Cart System Negative (-) | Main System Negative Output |
| Battery 1 (+) | Battery 2 (-) | Series Connection |
| Battery 2 (+) | Battery 3 (-) | Series Connection |
| Battery 3 (+) | Battery 4 (-) | Series Connection |
| Battery 4 (+) | Cart System Positive (+) | Main System Positive Output |
Always check the specific golf cart battery wiring diagram provided by your battery manufacturer. Some modern lithium systems are designed to be connected differently, especially if they use a single 48V unit.
Step 4: Making the Connections
Use high-quality, appropriately sized cables (the same gauge as your stock cables, or better).
- Attach Series Cables: Use short jumper cables to connect the batteries in series as described above. Ensure the connections are tight.
- Attach Main Cables: Connect the large positive cable from the cart’s main solenoid/controller to the main positive terminal (Battery 4+). Connect the main negative cable to the main negative terminal (Battery 1-).
- Terminal Tightness: Use your torque wrench to tighten all connections to the manufacturer’s recommended specification. Loose connections create resistance, heat, and poor performance.
Step 5: Integrating the Battery Management System (BMS)
Lithium batteries rely heavily on the Battery Management System (BMS) for safety. This system prevents overcharging, deep discharging, and monitors cell balance.
- Built-in BMS: Most modern drop-in best lithium batteries for golf carts have the BMS built inside the case. If this is the case, you only need to ensure the main positive and negative terminals are connected correctly.
- External BMS: Some advanced or modular systems require you to connect external wires to the controller or monitoring systems. Follow your specific manual for BMS wiring.
Step 6: Final System Check
Before closing the hood, perform essential checks.
- Voltage Check: With the multimeter, check the voltage across the two main output terminals. It should read close to 48 volts (or whatever your system voltage is).
- Controller Connection: Reconnect the main negative cable to the controller/solenoid.
- Test Run: Turn the key on. Test the forward and reverse functions slowly in a safe, open area. Listen for any unusual noises or excessive heat from the cables.
Charging Your New Lithium Setup
You cannot charge a lithium battery bank with a standard lead-acid charger. You must use a charger specifically designed for LiFePO4 chemistry and the correct voltage (e.g., 54.6V for a nominal 48V system).
- Use the Correct Charger: Always use the charger provided by the battery manufacturer or one confirmed to be compatible.
- Initial Charge: It is wise to fully charge the batteries after installing new golf cart battery bank before the first long drive.
- Charging Cycle: Lithium batteries charge much faster. Do not worry if they hit 100% sooner than you expect; this is normal.
Interpreting Performance and Maintenance
One of the biggest benefits of upgrading golf cart to lithium power is the reduced maintenance.
Maintenance Requirements
Lead-acid batteries require monthly watering, cleaning of corrosion, and periodic equalization charges. Lithium batteries require almost none of this.
- Keep it Clean: Wipe down the battery tops occasionally.
- Check Connections: Annually inspect the main terminal connections to ensure they remain tight.
Monitoring State of Charge (SoC)
With lead-acid, voltage drops steadily as you drive. With lithium, voltage stays high until it’s nearly empty. Relying only on voltage can lead to accidentally draining the battery too low, which can harm the cells if the BMS doesn’t intervene perfectly.
- Use a Gauge: Install a dedicated Lithium State of Charge (SoC) meter. These meters communicate with the BMS and provide an accurate percentage readout, which is much more reliable than raw voltage readings.
Troubleshooting Golf Cart Lithium Install Issues
Even with careful planning, issues can arise during or immediately after troubleshooting golf cart lithium install. Here are common problems and their simple fixes.
Problem 1: Cart Won’t Move or Controller Flashes Errors
This is usually a wiring or BMS lockout issue.
- Check Main Power: Confirm you have 48V across the main terminals. If you have zero, you likely have a major short or the main fuse blew.
- BMS Communication: If the BMS has shut the system down (perhaps due to an improper connection or a momentary over-voltage spike), disconnect the main positive cable for five minutes. This often resets the BMS. Reconnect and try again.
Problem 2: Batteries Don’t Seem to Charge
If the charger indicator light stays red or doesn’t turn on:
- Charger Compatibility: Double-check that the charger is specifically for LiFePO4 chemistry and matches the voltage profile (e.g., 54.6V).
- Temperature Lockout: Most lithium batteries have temperature sensors. If the battery pack is too cold (below freezing) or too hot, the BMS will prevent charging until the temperature is safe. Move the cart to a moderate environment.
Problem 3: Reduced Runtime After Installation
If you are not getting the expected range after installing new golf cart battery bank:
- State of Charge: Were the batteries fully charged before the run?
- Driving Habits: Lithium performs best when not drained below 20%. Constantly running them down to near zero will limit range in subsequent trips until they are fully recharged.
- Tire Pressure and Load: Heavy loads or underinflated tires drastically reduce range, regardless of battery chemistry.
Selecting the Right Batteries for Your Cart
Choosing the best lithium batteries for golf carts depends on your needs, cart type (Club Car, EZ-GO, Yamaha), and desired voltage.
Key Specifications to Compare
When shopping, look beyond just the price tag. Focus on these technical details:
- Ampere-Hours (Ah): This is the capacity. A higher Ah rating means longer run time between charges. Standard replacement packs often range from 100Ah to 150Ah.
- Continuous Discharge Current: This is how much power the battery can safely provide at once. Stock golf cart controllers usually draw 30-50 amps continuously, but peak startup current can be higher. Ensure the battery’s continuous rating exceeds your controller’s maximum draw.
- Voltage Match: Ensure the battery pack voltage matches your cart’s existing system (e.g., 36V, 48V).
Many reputable brands offer “drop-in” replacement batteries that are sized to fit the existing lead-acid trays, making the golf cart battery replacement process very straightforward.
Finalizing Your Lithium Conversion
Congratulations on upgrading golf cart to lithium power! You have invested in a superior power source that will serve your cart for years with minimal fuss. Take the time to review your final golf cart battery wiring diagram one last time before securing the battery cover. Enjoy the silence, the speed, and the freedom from battery maintenance that comes with modern lithium technology.
Frequently Asked Questions (FAQ) About Lithium Golf Cart Installation
Can I use my old lead-acid charger for lithium batteries?
No. You must use a charger specifically designed for lithium iron phosphate (LiFePO4) batteries at the correct voltage (e.g., 54.6V for a 48V system). Using the wrong charger will damage the battery or the internal BMS.
Does installing lithium batteries require a new controller?
Usually, no. Most modern golf cart controllers are compatible with lithium batteries, provided the battery voltage matches the system voltage (e.g., 48V controller with a 48V battery). However, some older controllers might need reprogramming or upgrading to take full advantage of the lithium system’s stable voltage output.
How do I determine the size of the cables needed for connecting golf cart lithium battery packs?
Cable gauge depends on the current draw. For most standard golf carts (up to 500 amps peak draw), 2-gauge or 4-gauge cables are typically used for the main battery-to-controller connections. Always check your cart’s specifications and the battery manufacturer’s recommendations.
What happens if I deeply discharge a lithium golf cart battery?
Deep discharging (draining below the manufacturer’s minimum voltage threshold) can damage the individual cells and significantly shorten the battery’s overall life. Modern lithium batteries have a built-in BMS designed to cut power before this happens, but relying on this repeatedly is not recommended. Install a proper SoC meter.
Is it safe to leave my lithium batteries connected all the time?
Yes, it is generally safe. The BMS monitors the battery constantly, even when the cart is off. However, if the cart sits unused for many months, it is best practice to connect the charger periodically to keep the pack topped off near 50-70% charge, depending on the manufacturer’s long-term storage advice.