
Can I build a wooden tool chest myself? Yes, you absolutely can build a wooden tool chest yourself. This guide will walk you through the entire process, from picking the wood to finishing your new storage unit. Building a wooden toolbox is a rewarding project that gives you custom storage for your gear.
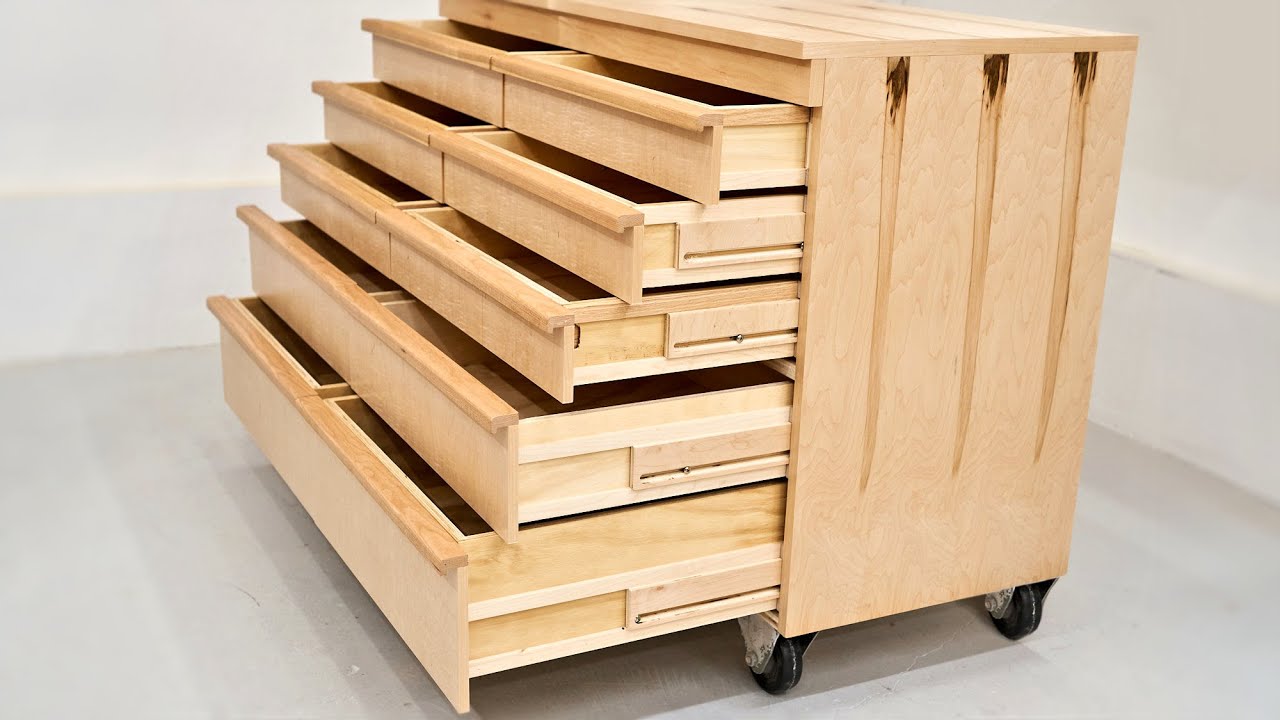
Image Source: i.ytimg.com
Planning Your Woodworking Chest Construction
Before cutting any wood, good planning saves time and money. Deciding on the size, style, and features of your chest is the first big step in woodworking chest construction. Think about what tools you need to store. Are they small hand tools, or larger power tools? This impacts the depth and width of your design.
Selecting the Best Wood for Tool Chests
The material you choose affects how long your chest lasts and how heavy it is. The best wood for tool chests balances strength, cost, and look. Hardwoods are generally better for durability.
| Wood Type | Pros | Cons | Best Use |
|---|---|---|---|
| Pine | Cheap, easy to find, light | Soft, dents easily | Light-duty chests, decorative boxes |
| Oak (Red or White) | Very strong, resists wear | Expensive, harder to work with | Heavy-duty, heirloom chests |
| Maple | Strong, smooth finish | Can be pricey | Durable boxes needing a fine finish |
| Baltic Birch Plywood | Stable, strong layers | Edges need covering | Cases, drawer boxes |
For a sturdy, long-lasting unit, a mix of hardwoods for the frame and maybe some good quality plywood for the sides works well. This project focuses on a classic, durable design, making oak or maple good choices if the budget allows.
Sketching Out Your Custom Tool Chest Design
Grab paper and a pencil. Start sketching. Think about the look you want. Do you want a simple open box, or one with drawers? Draw out the basic shape. Measure the space where the chest will live. This helps you determine the overall size. Good plans for tool storage are essential here. A simple design is often best for a first-time builder.
Gathering Tools and Materials
Once the plan is set, it’s time to collect everything. You will need tools for measuring, cutting, joining, and finishing.
Essential Tools List
You don’t need a full professional shop, but certain tools make the job much easier.
- Measuring and Marking: Tape measure, square, sharp pencil.
- Cutting: Circular saw or table saw (table saw is better for accurate long cuts). Miter saw for precise angle cuts.
- Joining: Clamps (many clamps!), drill, screws, wood glue.
- Shaping/Smoothing: Hand plane or belt sander, orbital sander, various sandpaper grits (80, 120, 180, 220).
- Optional but helpful: Router for edge profiles, chisels for fine-tuning homemade joinery chest details.
Required Materials
Based on a standard chest size (say, 30 inches long, 15 inches deep, 18 inches tall):
- Lumber for the carcass (sides, top, bottom). Account for waste! Buy 20% more than you think you need.
- Hardware: Hinges (heavy-duty for the lid), handles, and possibly drawer slides if you add drawers.
- Fasteners: Wood screws or dowels, depending on your joint method.
- Glue: High-quality PVA wood glue.
- Finish: Stain, oil, or polyurethane.
Step-by-Step Guide to Building the Carcass
The carcass forms the main body of your storage unit. This is the core of constructing a lumber tool chest. We will focus on strong, simple joinery.
Cutting the Main Panels
Accuracy matters here. If your panels are not square, the whole chest will rack (twist) later.
- Cut the Sides (2): These pieces determine the height. Ensure the top and bottom edges are perfectly parallel.
- Cut the Front and Back (2): These pieces determine the length and depth.
- Cut the Bottom (1): This piece will fit inside the four walls or overlap them. We will make it overlap for extra strength.
Tip: Label each piece lightly with a pencil immediately after cutting. (e.g., “Side A,” “Front B”).
Assembling the Box Structure
For a strong build, especially when building a hand tool box, butt joints reinforced with screws or dowels are simple and effective. If you are feeling ambitious, use rabbet joints or dadoes.
Option A: Simple Butt Joints with Screws
This is the fastest way.
- Apply a generous, even layer of wood glue to the end grain of one side panel where it meets the front panel.
- Clamp the pieces together tightly, making sure they are perfectly square using a framing square.
- Drill pilot holes through the face of the front panel into the edge of the side panel. Pilot holes prevent the wood from splitting.
- Drive screws into the pilot holes. Wipe away any glue squeeze-out immediately with a damp cloth.
- Repeat this process for all four corners until the main box shape is formed.
Option B: Utilizing Homemade Joinery Chest Techniques (Dowel or Biscuit Joints)
For a cleaner look without visible screws, use dowels or biscuits. This requires precise drilling. This method elevates the quality of your homemade joinery chest.
- Mark the location for your dowels or biscuits on both mating surfaces. Keep them centered and consistent across all joints.
- Use a jig or specialized tool to cut the holes or slots accurately.
- Apply glue to the holes/slots and insert the dowels or biscuits.
- Assemble the box, clamp firmly, and allow the glue to cure fully before removing clamps.
Adding Reinforcement and Feet
A heavy tool chest needs good support. You can either recess the bottom panel or attach runners to the bottom. Attaching runners (short blocks of wood) keeps the main structure off the floor and provides strong anchor points.
- Cut four small blocks of hardwood for feet.
- Glue and screw these blocks securely into the corners of the bottom of the assembled box.
Designing and Building the Lid
The lid is critical; it protects your tools and needs strong hinges. A simple flat lid is easiest, but a slightly domed or overlapped lid offers better weather protection.
Flat Lid Construction
For a simple build, the lid should overhang the sides slightly (about 1/2 inch on all sides) to shed water and provide a finished look.
- Cut the top panel slightly larger than the main box dimensions.
- If you are using a single board, ensure the grain runs lengthwise for stability. If using plywood, seal the edges well.
- Sand the lid smooth.
Attaching the Lid
The choice of hinges is vital for a heavy lid. Do not skimp here. Use heavy-duty brass or steel hinges.
- Place the lid onto the carcass, ensuring the overhang is even all around.
- Mark the placement for the hinges on the back edge of the lid and the back rail of the chest.
- Use a chisel to lightly mortise (recess) the hinges so they sit flush with the wood surface. This prevents the lid from sitting too high.
- Screw the hinges into place. Test the opening and closing action.
Adding Stops and Safety Features
To prevent the lid from slamming down or opening too far:
- Stops: Install small wooden blocks on the inside top edges that the lid hits before fully closing against the back edge.
- Lid Stays (Optional): These mechanical arms hold the lid open at a safe angle while you rummage for tools. They are highly recommended, especially for woodworking projects for tools that involve heavy lids.
Constructing Drawers (If Applicable)
If your custom tool chest design includes drawers, they are often the trickiest part. Drawers need to slide smoothly and hold weight. This is where the quality of your DIY tool storage plans shows.
Drawer Box Construction
Drawers must be slightly smaller than the opening they fit into. Measure the inside opening, then subtract the thickness of the wood for the drawer front/back, and then subtract about 1/8 inch total for clearance on both sides.
- Sides (2): Cut these to the required length and height.
- Front and Back (2): Cut these pieces.
- Bottom (1): This is usually a thin piece of plywood that slides into a groove (dado) cut into the sides of the drawer box.
For strength, use dado/rabbet joints for the drawer box assembly, or use simple finger joints if you have the router bits.
Installing Drawer Slides
There are two main options for sliding mechanisms:
- Traditional Wood Runners: Simple strips of wood glued and screwed to the inside of the carcass and the drawer sides. This is classic and quiet if waxed, but less forgiving if sizes are slightly off. This works well for a classic, building a hand tool box aesthetic.
- Ball-Bearing Slides: These are modern, strong, and allow the drawer to open fully. They are essential if you plan on heavy tools or deep drawers. Follow the manufacturer’s instructions precisely for mounting these.
Attaching the Drawer Front
The drawer front is usually thicker and decorative. It is attached after the box is built and sliding properly.
- Place the drawer box into the slides.
- Hold the decorative drawer front piece against the box, ensuring even gaps (reveal) around the edges.
- Use clamps or double-sided tape to hold the front in place temporarily.
- From the inside of the drawer box, drive screws through the drawer side and into the back of the decorative front piece. This hides the fasteners.
Finishing Touches and Hardware Installation
A good finish protects the wood and enhances the beauty of your creation.
Sanding for Success
Sanding is not optional; it determines the final feel of the chest.
- Start with a coarse grit (80 or 100) to remove any major glue squeeze-out or saw marks. Work with the grain.
- Move to 120 grit.
- Finish with 180 or 220 grit. Stop here for most finishes, unless you are aiming for a mirror shine.
Applying the Finish
The best finish for a tool chest resists scratches and moisture.
- Oil Finish (Tung or Linseed): Easy to apply, penetrates deep, gives a natural look. Requires re-oiling occasionally.
- Polyurethane (Wipe-on or Brush-on): Very durable, offers excellent water resistance. Multiple coats are needed. This is great for a chest that might see shop spills.
- Varnish: A good balance of protection and appearance.
Apply your chosen finish according to the product directions. Let each coat dry fully before moving to the next. Lightly sand with 320 or 400 grit paper between coats for a very smooth surface.
Installing Handles and Latches
Install the handles on the sides or front for carrying. Install the hasp or latch on the front. If you are adding a lock, ensure the metal strike plate is aligned perfectly so the locking pin engages smoothly.
For a traditional look, use simple, cast-iron hardware. For a lighter build, use modern bail pulls.
Specific Considerations for Heavy-Duty Storage
If you are truly building a wooden toolbox meant to hold heavy wrenches and hammers, you must reinforce the interior.
Drawer Liners
To prevent metal tools from sliding around and damaging the wood base:
- Use thin rubber matting (shelf liner).
- Use felt or thin carpeting glued to the bottom of the drawers.
Adding Tool Trays and Dividers
A large open chest is just a big box. To make it useful, add internal organization.
- Removable Trays: Build shallow trays that rest just below the lid opening. These are perfect for frequently used items like screwdrivers and pliers. The tray rests on cleats attached to the inside walls.
- Fixed Dividers: For the bottom section, build partitions running front-to-back or side-to-side. These should be firmly glued and screwed to the bottom panel and the sides. This keeps heavy items from shifting during transport.
These elements are crucial for effective plans for tool storage and make the chest much more functional than a simple box.
Final Review and Testing
Once the finish is cured, it is time for the moment of truth.
- Test the Movement: Open and close the lid several times. Does it stick? Are the hinges smooth?
- Test the Drawers: Load the drawers with a few heavy items (like a couple of vise grips or a wrench set). Open and close them slowly. Do they bind or sag? If they sag, you might need to reinforce the drawer slides or bottom panel.
- Load It Up: Begin filling your new chest. Place the heaviest items near the bottom and center for stability, whether you built a simple box or a complex rolling cabinet.
Congratulations! You have successfully completed a major piece of woodworking projects for tools—your very own wooden tool chest.
Frequently Asked Questions (FAQ)
Q: What is the ideal height for a hand tool chest?
A: For a stationary chest, the height should allow you to see everything inside easily when the lid is open, usually around 18 to 24 inches. If it’s portable, make sure it’s light enough to lift when full.
Q: Can I use a simple butt joint for the corners?
A: Yes, you can use a simple butt joint, but you must reinforce it heavily with glue, screws, or dowels, especially if you are constructing a lumber tool chest that needs to withstand rough handling.
Q: How do I keep the lid from slamming shut on my fingers?
A: Install gas struts or mechanical lid stays. These devices control the speed at which the lid closes and hold it open securely, which is an essential safety feature for any large tool chest.
Q: What size lumber should I use for the main sides?
A: For a durable chest, use nominal 3/4 inch thick lumber (which is actually about 19mm thick). This provides good mass and strength without making the chest overly heavy.
Q: Is it hard to make my own dovetail joints for this project?
A: Dovetails are beautiful but complex. If this is one of your first woodworking chest construction projects, start with rabbet or dado joints. Dovetails require significant practice to get perfect.