
A rivet tool works by mechanically pulling a mandrel through the body of a rivet, causing the tail end of the rivet to expand and clamp two or more materials tightly together. This action creates a strong, permanent joint.
Rivet tools are essential fasteners. They create a secure hold where screws or welds might not be ideal. From small crafts to large aircraft, these tools play a vital role. This guide will explain the parts, the action, and different kinds of tools used for this job.
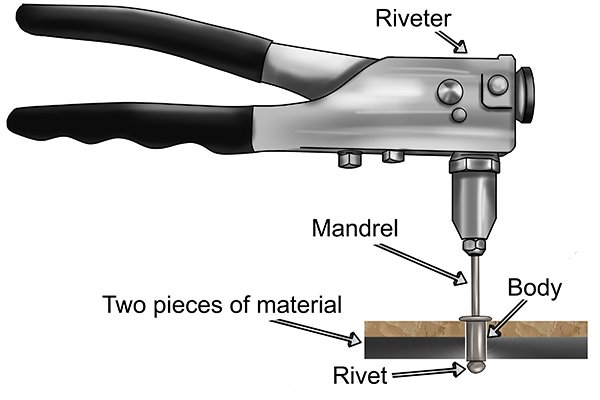
Image Source: www.wonkeedonkeetools.co.uk
Deciphering the Basics of Riveting
A rivet is a small metal pin. It has a head on one side. The other end, the tail, is shaped to be deformed. When you use a rivet tool, you set the rivet. This means you change its shape permanently. This change locks the materials together.
The basic process involves placing the rivet into a pre-drilled hole. The tool grips the mandrel (the pin part). Then, the tool pulls the mandrel. This pulling action makes the soft tail of the rivet flare out. This flared part presses firmly against the backside of the material. Once the tail is fully flared, the mandrel snaps off. The joint is now secure.
Components of a Standard Rivet Assembly
To grasp how a rivet tool works, we must first know the parts involved:
- Rivet Body: This is the main metal shaft. It fits snugly into the hole.
- Head (Head Diameter): This part sits against the top material. It stops the rivet from being pulled through.
- Mandrel (Mandrel Pin): This is the center pin inside the rivet body. The tool grabs this pin.
- Tail (Deforming End): This end is shaped for expansion when pulled.
| Component | Function | Material Connection |
|---|---|---|
| Rivet Body | Fills the hole; holds materials together. | Direct contact with joined sheets. |
| Head | Provides a bearing surface on the front side. | Top surface of the fastened item. |
| Mandrel | Pulled by the tool to set the rivet. | Broken off after setting. |
| Tail | Expands to form the second head/lock. | Creates the rear clamp. |
Exploring Different Rivet Tool Types
Not all riveting is done the same way. Engineers use different tools for different jobs, power levels, and settings. Knowing the rivet tool types helps you choose the right tool for the task.
Manual Rivet Setter
This is the simplest tool. It is often called a hand riveter or manual rivet setter. It relies entirely on hand strength.
Operation of the Manual Setter
The rivet gun operation here is very straightforward. You load the rivet into the nosepiece. You place the tool nose against the material. Then, you squeeze the handles together repeatedly. Each squeeze pulls the mandrel a small amount. This continues until the rivet sets.
- Good for small jobs or light materials.
- Low cost and easy to carry.
- Requires significant physical effort.
Battery-Powered Cordless Riveters
These tools use rechargeable batteries. They automate the pulling action. They offer more power than manual setters without needing an air hose. They are great for medium-duty tasks.
Pneumatic Riveting Tools
For factory settings or heavy construction, power is key. The pneumatic riveting tool uses compressed air to do the heavy work.
The Pneumatic Mechanism
These tools connect to an air compressor. The compressed air drives a piston inside the tool body. This piston creates the necessary pulling force on the mandrel. This makes setting large or tough rivets fast and easy. The force generated is much higher than a manual tool.
Hydraulic Riveting Tools
These are the powerhouses of the riveting world. A hydraulic riveting tool uses pressurized fluid (oil) instead of air.
- Offers the maximum pulling force.
- Used for setting large structural rivets, like in bridges or heavy machinery.
- They are often slower than pneumatic models but far stronger.
The Detailed Rivet Setting Process
Whether you use a hand tool or a high-powered machine, the core mechanism remains the same. This section breaks down the rivet setting process step-by-step.
Step 1: Preparation
First, the materials must be ready. They need holes drilled. The holes must match the rivet body diameter closely. This ensures a tight fit. The parts are lined up precisely where they need to be joined.
Step 2: Loading the Rivet
The correct nosepiece must be attached to the tool. The nosepiece matches the rivet size. The rivet is inserted into the tool’s nosepiece. The mandrel sticks out slightly.
Step 3: Positioning the Tool
The rivet head is placed against the joint material. The nosepiece of the tool holds the rivet body firmly. The operator brings the tool tight against the material surface. This ensures no gaps exist before the setting begins. This tight contact is key to proper blind rivet installation, especially for pop rivets where access is only from one side.
Step 4: Actuation and Mandrel Pull
This is where the tool does its work.
- Manual Tool: The user squeezes the handle levers.
- Pneumatic/Hydraulic Tool: The trigger is pulled. This releases the pressurized air or fluid.
This force is transmitted to the mandrel gripping mechanism inside the tool. The tool pulls the mandrel backward through the rivet body.
Fathoming the Pop Rivet Gun Mechanism
The pop rivet gun mechanism is a specific example of this action. When the mandrel is pulled:
- The rear portion of the rivet body is drawn into the nosepiece throat.
- This constriction forces the softer metal of the tail end to expand outward.
- This expansion forms a secondary head shape, securely clamping the rear material.
Step 5: Mandrel Breakage
Once the tail end has expanded enough to form the required clamp, the stress on the mandrel becomes too high. The mandrel is designed to break at a specific point, called the neck. The remaining part of the mandrel (the stem) falls away.
Step 6: Inspection
The tool is pulled away. The joint is checked. The head on the front should be flat and smooth. The tail end (the set side) should show a firmly expanded, mushroomed shape. The two materials should be pulled tightly together with no space between them.
Deep Dive into Blind Rivet Installation
A major use case for these tools is blind rivet installation. Blind rivets (or pop rivets) are unique because they only require access to one side of the assembly. This is crucial when fastening sheets that are already assembled, like attaching a bracket inside a box.
The rivet gun operation for a blind rivet relies entirely on the mandrel pulling the tail section backward toward the nosepiece.
- The rivet body passes through the hole.
- The nosepiece rests against the outer surface.
- As the mandrel pulls, the inner shaft of the rivet pulls the tail over the nosepiece shape.
- This deforming action locks the materials.
If the tool is not powerful enough, or if the rivet is the wrong size for the material thickness, the blind rivet will fail to set correctly. It might pull through the hole or fail to clamp the rear material tight.
Tool Maintenance and Longevity
Proper care is vital for any tool. Good rivet gun maintenance ensures reliability and safety. This applies to all types, from the small manual rivet setter to large industrial units.
General Maintenance Tips:
- Cleaning: Keep the nosepieces and the tool body free of metal shavings and dust. Debris can jam the pulling mechanism.
- Lubrication: Pneumatic and hydraulic tools require specific lubrication for their internal seals and pistons. Consult the manual for the correct oil type. Air tools need regular oil injected into the air inlet.
- Nosepiece Inspection: Worn nosepieces do not grip the mandrel correctly. This causes slippage and poor setting. Replace them when they show signs of wear.
- Pressure Checks (Pneumatic): Always ensure the air pressure is within the tool’s operating range. Too low, and the tool won’t set large rivets. Too high, and internal seals can blow out.
For a pneumatic riveting tool, check the air line hoses frequently. Leaks reduce power and efficiency dramatically.
Comparing Power Sources: Air vs. Hydraulic
The choice between a pneumatic riveting tool and a hydraulic riveting tool often comes down to the job’s demands.
| Feature | Pneumatic Riveting Tool | Hydraulic Riveting Tool |
|---|---|---|
| Power Source | Compressed Air | Pressurized Fluid (Oil) |
| Force Output | High | Very High (Maximum) |
| Speed | Very Fast Cycling | Moderate to Fast |
| Portability | Requires air line/compressor | Often self-contained or uses a separate pump |
| Best For | High-volume production lines, medium-heavy materials | Structural work, setting the largest rivets |
While a hydraulic riveting tool gives raw power, it can sometimes be slower to reset between rivets compared to a fast-cycling air tool.
How to Use a Rivet Setter Safely and Effectively
Knowing how to use a rivet setter correctly prevents injury and ensures strong joints. Safety must always come first.
Safety Precautions
- Eye Protection: Always wear safety glasses. Mandrels snap off under high tension and can fly out.
- Hand Protection: Wear gloves when handling rivets and setting the tool, especially heavy-duty ones.
- Secure Grip: Ensure the tool is held firmly perpendicular (straight on) to the workpiece. Tilting the tool causes uneven stress and weak rivets.
- Ventilation (for some rivets): Some rivets release fumes when set; work in well-ventilated areas if necessary.
Technique Tips for Optimal Joints
When using any rivet tool types, focus on consistent application of force.
- Consistency is Key: If using a manual tool, apply smooth, steady pressure. Jerky movements create weak spots.
- Correct Size: Ensure the rivet grip range matches the combined thickness of the materials you are joining. Too long a rivet wastes material; too short will not form a proper tail.
- No Gaps: Before pulling the mandrel, ensure the rivet head is fully seated against the material. Any air gap before setting results in a loose joint after setting.
Advanced Applications and Specialized Tools
While most common applications use hand-held tools, industrial assembly lines use highly automated systems. These systems often feature robotic arms equipped with specialized riveting heads.
These large-scale systems manage the entire rivet setting process automatically: feeding the rivet, drilling the hole (sometimes), placing the rivet, and setting it. This level of automation maximizes speed and uniformity in manufacturing plants.
Frequently Asked Questions (FAQ)
Q: What is the difference between a rivet and a bolt?
A: A rivet is a permanent fastener; it requires destruction of the rivet body (by breaking the mandrel) to remove it. A bolt is a temporary fastener that uses threads and a nut, allowing for easy disassembly.
Q: Can I use a manual rivet setter on thick steel plates?
A: Generally, no. Manual setters lack the required force for thick or high-strength steel. You need a pneumatic riveting tool or a hydraulic riveting tool for structural steel applications.
Q: Why did my rivet spin after setting?
A: If a rivet spins after setting, it usually means the mandrel broke prematurely or the rivet grip size was too large for the material thickness. This results in an incomplete expansion of the tail, leading to a loose connection.
Q: How often should I lubricate my pneumatic riveting tool?
A: This depends on usage. For heavy daily use, lubricate before starting each shift. For intermittent use, lubricate after every few hours of continuous operation, following the manufacturer’s guide for injection points.
Q: What is a ‘nosepiece’ on a rivet gun?
A: The nosepiece is the removable tip of the tool. It holds the rivet in place, guides the mandrel, and shapes the expanding tail end during the pop rivet gun mechanism action. Different nosepiece sizes are required for different rivet diameters.