
Can you cut crown molding on a standard miter saw? Yes, you can cut crown molding on a miter saw, but you will need to know the correct settings. Most crown molding installation jobs require precise angled cuts. Getting these cuts right makes all the difference in your final look. This guide will teach you the best ways to handle cuts for crown molding installation. We focus on using your miter saw for perfect corners every time.
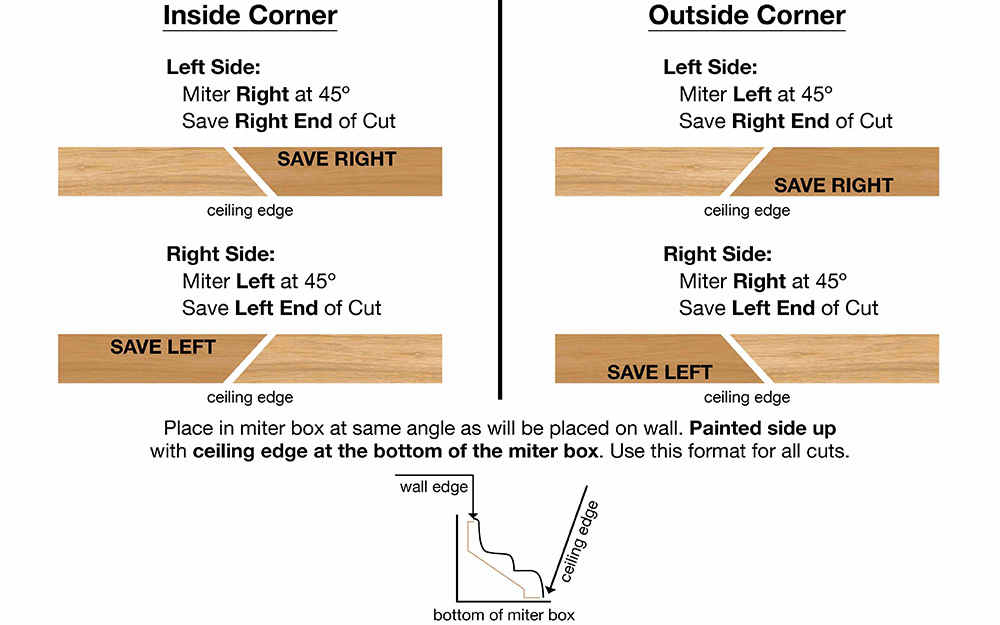
Image Source: contentgrid.homedepot-static.com
Essential Setup for Cutting Crown Molding
Cutting crown molding is different from cutting baseboard. Crown molding sits against the wall and ceiling. This means it has two angles: one against the wall and one against the ceiling. This position changes how you set up your saw.
Deciphering Compound Miter Saw Crown Molding Settings
When cutting molding, you must use compound settings. A compound cut involves two tilts: the miter angle (left or right) and the bevel angle (up or down). This is where most people get confused.
Setting up miter saw for crown molding requires you to decide how the molding rests on the saw table. There are two main ways to place molding:
- Flat Position: Laying the molding flat on the saw table. This is often hard for beginners.
- Coping Position (or Spring Angle Position): Holding the molding tight against the saw’s fence and baseplate, just as it sits in the room. This is the preferred method for accurate miter saw angles for crown molding.
When using the spring angle position, the saw needs two settings: the miter angle and the bevel angle. These angles compensate for the molding’s natural spring angle (usually 38° or 45°).
The Importance of the Spring Angle
Crown molding does not sit perfectly flat against a wall corner. Walls meet at 90 degrees, but the molding slopes up to meet the ceiling. This slope is the spring angle. Standard crown molding has a spring angle of 38° or 45°.
If your room corners are perfect 90 degrees, and your crown has a 45° spring angle, the math becomes simpler. However, rooms are rarely perfect. Holding the molding in the spring angle position on the saw lets the saw do the work for you.
Determining Miter and Bevel Angles for 90° Corners
For standard inside and outside 90° room corners, you need specific miter saw angles for crown molding. These angles are key for a tight fit.
Cutting Inside Crown Molding Corners
Cutting inside crown molding corners requires two pieces to meet neatly in the middle of the room corner.
If you place the molding in the spring angle position against the fence and baseplate:
- Miter Setting: Set your saw to 31.6° (for a 45° spring angle molding).
- Bevel Setting: Set your saw to 33.9° (for a 45° spring angle molding).
Important Note: If your molding has a 38° spring angle, you will use slightly different settings. Always check your crown molding cheat sheet or consult the manufacturer’s specifications.
| Corner Type | Molding Spring Angle | Miter Angle Setting | Bevel Angle Setting |
|---|---|---|---|
| Inside 90° | 45° | 31.6° | 33.9° |
| Inside 90° | 38° | 30.0° | 31.8° |
| Outside 90° | 45° | 26.4° | 33.9° |
| Outside 90° | 38° | 28.1° | 31.8° |
This table shows the settings needed when holding the molding in the spring angle position. This method is considered best practice for compound miter saw crown molding settings.
Cutting Outside Crown Molding Corners
Cutting outside crown molding corners involves two pieces meeting on the exterior point of a wall. The required angles are complementary to the inside corner cuts.
Using the spring angle position again:
- Miter Setting: Set your saw to 26.4° (for 45° spring angle molding).
- Bevel Setting: Keep the bevel setting the same as the inside cut: 33.9°.
Always remember: For an inside corner, the angle opens toward the center of the room. For an outside corner, the angle closes toward the point.
Advanced Cutting Techniques
Not all cuts are perfect 90-degree room corners. You must adapt your saw settings for different wall angles. This is a crucial part of crown molding installation.
Adapting Miter Saw Angles for Non-Standard Corners
What if your walls meet at 85° instead of 90°? You must adjust your formula.
- Find the Corner Difference: Subtract the actual wall angle from 180°. For an 85° corner: $180° – 85° = 95°$. This is the total angle the two pieces must add up to.
- Divide by Two: Divide this total by two to get the required miter angle for one piece (ignoring the spring angle for a moment). $95° / 2 = 47.5°$.
- Adjust Miter Setting: This calculated angle (47.5°) is what you should set your saw’s miter gauge to if you were cutting baseboard flat. Since we are using the spring angle position, you will use this resulting angle as a starting point to check against standard formulas or use an angle finder.
Crown molding hacks often involve using a digital angle finder directly on the room corner. Measure the wall angle, divide it by two, and then adjust your miter and bevel settings based on your molding’s spring angle.
Cutting profile crown molding
When cutting profile crown molding, especially ornate styles, it is vital that the molding stays firmly seated against the fence and baseplate. Any slight movement during the cut will ruin the profile match at the joint. Use clamps if your saw allows them, or steady pressure when making the cut.
Coping vs. Mitering Crown Molding
This is a long-standing debate in finish carpentry. Should you cut a miter joint or cope the joint?
Coping vs mitering crown molding
- Mitering: Involves cutting two opposing miter angles (like the ones detailed above) to meet perfectly. This is fast and works well if your walls are perfectly square (90°).
- Coping: Involves cutting a miter angle on one piece and then using a coping saw to cut out the profile shape (the “cope”) on that piece. The second piece only gets a square cut on the end that meets the first piece.
Why Cope?
Coping allows for slight imperfections in the wall angle. If the corner is 88° instead of 90°, a coping saw can trim the profile slightly to make a tight fit where a miter cut would leave a gap.
How to Cope Crown Molding:
1. Cut the first piece with a standard inside miter cut (using your compound miter saw crown molding settings).
2. Cut the second piece with the same miter angle, but now turn the saw around to cut the opposite direction.
3. Use a coping saw or jigsaw to cut away the wood behind the profile line.
4. The resulting shape should fit snugly against the face profile of the first piece.
Coping takes more time but often results in a cleaner, more professional finish, especially in older homes.
Practical Tips and Crown Molding Hacks
Even with the right settings, execution matters. Follow these tips for success.
Always Test Fit Your Cuts
Before cutting the actual piece for the wall, always cut a scrap piece. Set the saw to the required miter and bevel angles. Dry-fit the scrap against the wall corner. If there is a gap, adjust the angle slightly and try again. This saves material and frustration.
Handling Horizontal and Vertical Changes
Crown molding often runs across a ceiling or connects to a wall section that doesn’t have molding (like a door frame).
- Running Flat Across a Ceiling: When running molding straight across a ceiling joint, you cut the ends at 90° square cuts, not miters.
- Inside Ceiling Corners: When connecting two pieces of crown molding on the ceiling, you treat the ceiling corner exactly like an inside wall corner, using the same miter saw angles for crown molding.
Securing the Molding During the Cut
Stability is key when cutting profile crown molding.
- Use the Fence: Always push the molding firmly against the saw fence.
- Use the Baseplate: Ensure the bottom edge is tight against the saw table.
- Support Long Pieces: Have someone hold the long end of the molding, or use roller stands to support it. Vibration is the enemy of clean cuts.
Reference Materials: The Crown Molding Cheat Sheet
To make reference quick, keep these basic concepts close.
| Situation | Miter Angle (45° Spring) | Bevel Angle (45° Spring) | Saw Placement |
|---|---|---|---|
| Running Left to Right (Outside Corner) | 26.4° Left Tilt | 33.9° Down Tilt | Molding sits right side up |
| Running Left to Right (Inside Corner) | 31.6° Right Tilt | 33.9° Down Tilt | Molding sits right side up |
| Running Right to Left (Outside Corner) | 26.4° Right Tilt | 33.9° Down Tilt | Molding sits right side up |
| Running Right to Left (Inside Corner) | 31.6° Left Tilt | 33.9° Down Tilt | Molding sits right side up |
Note: This table assumes you are viewing the molding from the front, and the cut is opening correctly.
Why Compound Miter Saw Crown Molding Settings Are Necessary
A standard miter saw only tilts left or right (miter). It cannot tilt up or down (bevel). Crown molding requires both tilts because it is angled against two surfaces (wall and ceiling).
If you try to cut crown molding by laying it flat (not using the spring angle position), you must calculate the exact required miter angle based on the room angle and the molding’s spring angle. This calculation is complex and prone to error.
Example of Flat Cutting Error (45° Spring Angle, 90° Corner):
* Room Corner = 90°
* Molding Spring Angle = 45°
* Required Miter Cut (if flat): $45° – (90° / 2) = 0°$ (This is wrong!)
The correct formula for flat cutting is much harder: $Miter = 45° – \arctan(\tan(45°) / \cos(45°))$. This usually results in a 35.26° cut. However, if you set your saw to 35.26° miter and 0° bevel, the molding will not sit flush against the wall or ceiling.
This complexity is why using the compound miter saw crown molding settings with the molding held in the spring angle position is vastly superior for accurate crown molding installation.
Final Steps After Cutting
Once you have made your cuts, the job isn’t quite done.
- Check Fit: Place the two pieces together outside the room first, if possible. They should meet almost perfectly.
- Install: Secure the molding using finish nails or construction adhesive, followed by nails. Drive nails into the studs through the top (ceiling connection) and bottom (wall connection) flanges of the molding.
- Finishing: Fill any tiny gaps or nail holes with wood filler. Sand smooth, prime, and paint. A perfect cut minimizes filler work later.
Mastering angles is about practice and setup. Once you consistently use the spring angle position and the correct compound miter saw crown molding settings, cutting any profile, even complex cutting profile crown molding, becomes routine.
Frequently Asked Questions (FAQ)
Q: Can I use a standard miter saw without a bevel function for crown molding?
A: It is extremely difficult. A standard miter saw only makes straight miter cuts. Since crown molding requires both a miter cut (left/right) and a bevel cut (up/down angle to meet the ceiling), a standard saw cannot achieve the necessary compound angles unless you lay the molding flat and use complex math, which is not recommended for beginners.
Q: What is the standard spring angle for most crown molding?
A: The most common spring angles are 45 degrees and 38 degrees. Always check the packaging or manufacturer’s specifications for your specific molding profile. This dictates the required miter saw angles for crown molding.
Q: How do I adjust for an inside corner that isn’t exactly 90 degrees?
A: The best method for cutting inside crown molding corners when the wall angle is imperfect is coping. If you must miter, measure the actual angle with a digital angle finder, divide that angle by two, and then use your molding’s spring angle reference (like the included crown molding cheat sheet) to calculate the precise miter and bevel settings for your compound saw.
Q: What is the difference between coping and mitering?
A: Mitering cuts two opposing miter angles that meet at the point of the corner. Coping involves cutting one piece with a miter and then cutting the profile shape into that piece so it nests perfectly against the face of the second, square-cut piece. Coping is more forgiving for imperfect walls.
Q: Should I cut crown molding with the piece flat or held against the fence?
A: Holding the molding tight against the fence and baseplate (the spring angle position) is strongly recommended. This setup directly translates the real-world corner angle into the necessary saw angles, making the use of compound miter saw crown molding settings straightforward.